Distributions:
Depending on what you want to do with mbeddr, we provide three different installation methods:
-
mbeddr IDE: sufficient, if you want to
use mbeddr, but not change or extend it. -
mbeddr Plugins Distribution: suitable if you want to
use and extend mbeddr. With this approach, you install MPS manually on your machine and deploy the mbeddr plugins into this installation. -
mbeddr from Sources: use this option if you want
total control over what you are doing with mbeddr or want to stay at the bleeding edge of mbeddr development.
- mbeddr 2018.2.0 (built on 29.11.2018, based on MPS 2018.2.6)
(NEW) - mbeddr-IDE (one-click installer):
- mbeddr plugins:
- github sources:
- Older versions
mbeddr IDE
With the mbeddr IDE you can use all languages provided by mbeddr and write applications with them. Installing the IDE is simple, as you just have to run the installer.
mbeddr Plugin Distribution
In case you do not want to change mbeddr but still want to be able to extend it (so you'll need MPS' language engineering facilities), we recommend installing the distribution. Furthermore, we do not provide installers for Linux or MacOS and thereby, mbeddr can be installed only "manually" using this method or compiled from sources as explained below. Installing the plugins distribution just requires downloading a ZIP file and copying a bunch of plugins into your existing MPS installation. If you do not have an existing MPS installation on your machine, please follow the steps described in JetBrains MPS and Java.
To install the distribution, please download the distribution ZIP file ("all-plugins") from the mbeddr GitHub release page: github releases page. This ZIP file contains the mbeddr plugins for MPS. After unzipping, please take all folders inside the plugins directory and copy them into the plugins directory of your MPS installation. Note that there is also a plugin (without the s) directory under MPS.
Recommended: Check out this video for a step-by-step tutorial on how to install the plugins and open the tutorial project.
mbeddr Source Installation
Installing mbeddr from sources gives you total control over what you want to do with mbeddr. We rather recommend working with the distribution or the mbeddr IDE, except if you have good reasons not to. The following list provides some of these good reasons:
-
want to stay at the bleeding edge of mbeddr development by using the most recent version on master.
-
plan to fork mbeddr.
-
need to regularly update your local mbeddr.
The following guide will explain you how to install mbeddr from sources. Please carry out the following instructions step by step in their defined order:
-
First, in order to clone the mbeddr repository, you will need to have a client git client installed on your local machine (see Required Tools and Versions).
-
If you do not already have an MPS installation on your machine, please follow the installation guide in JetBrains MPS and Java.
-
Next, clone the mbeddr repository from GitHub onto your local machine. You can find it at mbeddr.core, the repository URLs to be used for cloning (for various protocols) can also be found at this URL.
-
After cloning the repository, you now have to build all languages shipped with mbeddr. For this task we provide gradle support, which is a .bat or shell script located inside the mbeddr.core (project root) directory. Depending on your operating system, you either use gradlew.bat (Windows) or gradlew (Linux/Mac). Before running the script, you first have to copy the gradle.properties.example into the same folder and rename it to gradle.properties. Next, open this file and change the paths (On Windows, you have to use forward slashes as directory separators even on Windows!) of the following property:
-
mpsHomeDir: points to the Contents folder of your MPS installation
You can now execute the gradle script with the argument build_mbeddr (e.g. for Windows "gradlew.bat build_mbeddr"). The script downloads the appropriate libraries automatically. At the end of the build you should get a message stating BUILD SUCCESSFUL. Depending on the performance of your machine, running the script takes between 20 and 45 minutes.
-
-
We now have to make future application projects aware of the mbeddr.core languages in your local repository. Start MPS and go to the File->Settings (on the Mac it is under MPS->Preferences) and select the Path Variables in the IDE Settings. Create a path variable named mbeddr.github.core.home and point to the root directory of your mbeddr git clone (e.g. /Users/peter/Documents/mbeddr.core).
-
Finally, go to the Global Libraries section in the IDE settings (see Changing Global Libraries). Create a library named sl-all pointing to the code/plugins/sl-all directory and a second one named mbeddr.core that points to the code/languages directory of the github repository directory (/Users/peter/Documents/mbeddr.core/code/languages). Make sure you define them in this order otherwise it will not work! Because we had earlier defined the path variable, it will use the path variable for defining the library. Notice that this is a global setting, which means it has to be performed only once before your first application project.
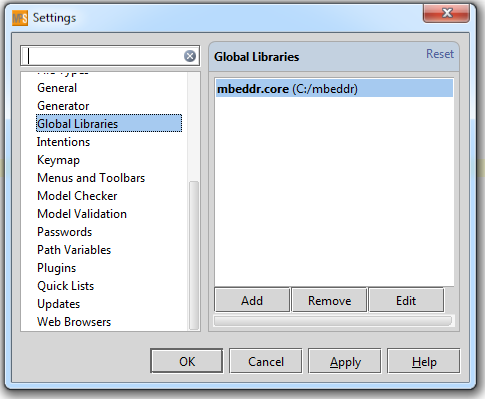
Defining a global library so that application projects can see mbeddr.
Congrats: you are now ready to build your first project with mbeddr!
Gcc, Make and Gdb
mbeddr relies on gcc and make for compilation and gdb for debugging. You must install these tools unless you have a different, target-specific build process. Below we describe the installation of these tools on the various platforms.
-
Windows: We recommend installing MinGW (see Required Tools and Versions), a port of the GNU tools to Windows. When selecting the packages to be installed (only Class bin), make sure mingw32-gcc, mingw32-gdb and mingw32-make are included (all of them are in the All Packages subtree in the selection dialog).
-
Linux: These tools should be installed by default. Otherwise use your favourite package manager to install them (see Required Tools and Versions).
-
MacOS: You should install XCode's command line tools to get gcc, make and the associated tools (see Required Tools and Versions). XCode comes with lldb, which is not yet supported by mbeddr. Therefore you have to install gdb via brew (see Required Tools and Versions). Use the following command for installing gdb: brew install https://raw.github.com/Homebrew/homebrew-dupes/master/gdb.rb. Additionally, you have to sign a certificate for gdb (GDB_on_OS_X_Mavericks_and_Xcode_5).
After the installation, please make sure the tools can be invoked from the command-line. If this is not possible, please add them to your system path, as described in Adding Tools to the System Path.
Graphviz
mbeddr supports visualization via PlantUML (http://plantuml.sourceforge.net), directly embedded in MPS. To use it, you have to install graphviz. Required Tools and Versions describes which version is required and where to get it from. After the installation, you have to put the bin directory of graphviz into your system path (see Adding Tools to the System Path). On Windows, in addition, you also need to have an environment variable GRAPHVIZ_DOT that points to the dot.exe file supplied with graphviz.
Verification Tools
To be able to use the verifications in mbeddr, you have to install CBMC, which is a C-level model-checker. Required Tools and Versions describes which version is required and where to get it from. You can find installers for the various platforms at the bottom of the website. After the installation, please make sure CBMC can be invoked from the command-line. If this is not possible, please add it to your system path, as described in Adding Tools to the System Path. CBMC uses gcc for preprocessing the C files, so please make sure that you have gcc installed on your machine.
JetBrains MPS and Java
The mbeddr system is based on JetBrains MPS, an open source language workbench available from jetbrains.com. MPS is available for different platforms, like Windows, Mac and Linux. Please make sure you pick the right installer for your platform and the proper version (see Required Tools and Versions). When running the installer, please make sure you install MPS in a path that does not contain blanks in any of its directory or file names (not even in the MPS folder). This will simplify some of the command line work you may want to do. After installing MPS, please follow the platform-specific steps mentioned below.
-
Windows: If you installed MPS with the Windows-specific installer, Java was already installed along with it. Open the bin folder and edit, depending on weather you are running mbeddr on a 32- or 64-bit machine, either mps.exe.vmoptions or mps64.exe.vmoptions. To make MPS run smoothly, increase the MaxPermSize setting to at least 512m. This JVM setting controls how much space is occupied for loaded Java classes, methods etc.
-
Linux: Make sure you have installed Java on your machine (Version 1.6 or higher). Next, open the bin folder and edit the mps.vmoptions. To make MPS run smoothly,increase the MaxPermSize setting to at least 512m.
-
Mac: Make sure you have installed Java on your machine (see Required Tools and Versions) Next, open the app folder (right click on the application and do a Show package contents) and open the Contents folder. Open the Info.plist file with a text editor and navigate to the entry VMOptions at the very bottom of the file. Edit the mps.vmoptions to make MPS run smoothly, increase the -XX:MaxPermSize setting to at least 512m.
If your MPS does not start with the error message Could not create the VM, then your system has less main memory available than required. In this case, you should open the previously edited file (*.vmoptions or Info.plist) and decrease the value of the -Xmx parameter in small steps, until you are able to start MPS. This parameter controls the maximum size of dynamic memory that the JVM provides to MPS.
Adding Tools to the System Path
For mbeddr/MPS to be able to access command-line tools, their binaries have to be added to your system's PATH variable. You can do this either globally, or locally in the script that starts up MPS. The way how the PATH variable is changed depends on your platform. The table below shows these platform-specific differences.
For changing the variable locally, open your start-up script that is located inside your MPS installation directory. Next, add the PATH redefinition at the beginning of that file, replacing <your path> with the file system path of the tool you want to add to the path. For details see the second column of the table below.
To change the path globally, see the right column of the table below. It explains how to add tools to the global PATH on the different platforms. Here, you should also replace <your path> with the file system path that points to your tool.
locally |
globally |
|
|---|---|---|
Windows |
start-up script: |
in your Windows System Settings, change the value of the PATH variable by adding your path to the existing paths: <existing path>;<your path> |
Linux/Mac |
start-up script: |
in general you will have to add your tool path to the PATH variable. However, the way how this is done depends on your actual operating system and the shell you are using. Since nowadays almost every Unix system comes with a bash shell, we describe the process just for tis scenario. In case you using a different shell, please refer to the vendor's documentation. First, create or open your existing .bash_profile, that is located inside your home folder. Next, just add the following line to it, save the file and restart your shell: export PATH=<your path>:$PATH |
Required Tools and Versions
The following table lists all tools mentioned in this guide, on which platform they are needed, in which version, which components are required and where to get the tool from.
| Tool | Platform | Version | Required Components | URL |
|---|---|---|---|---|
| MinGW | Windows | newest | mingw32-gcc (v 4.8.1), mingw32-make (v 3.82.90-2), mingw32-gdb (v 7.6.1), msys-base (v 2013072300) and msys-coreutils (v 5.97-3) |
mingw.org |
| XCode | Mac | newest | gcc and make | - |
| Brew | Mac | - | gdb76 (available in repository coolya/mbeddr) |
brew.sh |
| make | Linux | newest | - | - |
| gcc | Linux | newest | - | - |
| gdb | Linux | newest | - | - |
| Graphviz | all | 2.30 | - | graphviz.org |
| CBMC | all | 5.8 | - | cprover.org/cbmc |
| ant | all | newest | - | ant.apache.org |
| git | all | newest | - | - |
| JDK | Windows | 1.8 | - | - |
| JDK | Linux | 1.8 | - | - |
| JDK | Mac | 1.8 | - | - |